Welcome to The Mommy Concept

I thank you for visiting my Blog and hope you enjoy!

Saturday, April 21, 2012

Yeah for Earth Day!

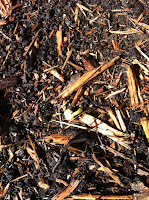
Tomorrow, April 22nd, is Earth Day! What are you doing to celebrate the Earth? I made it my goal, this year, to do a couple things to help out the environment. The first thing I decided to do was to bring reusable bags to the grocery store. (This concept is so yesterday, right?!?!) I have plenty of bags at home, but always seem to forget to bring them with me, and don't make the effort to remember. What a lame excuse, considering all the waste it causes. My second Earth Day goal is the start of our first ever raised bed garden! The wood was purchased last week, the structure assembled (by DJ...he's handy), the plot was dug out and today the setup is complete (organic compost, organic mulch, cow manure and all)! I am getting very excited to start planting our organic seeds. I am hoping to have the girls involved, as much as possible, and hope it gives them a better appreciation for where food comes from, and makes them excited for their home grown organic vegetables. One other conservation method I heard of, but haven't yet tried, is placing a bucket under the faucet as you wait for your water to heat up. The water you collect can be used to nourish indoor and/or outdoor plants. Sounds like a fun idea, I'm just not sure what kind of bucket would be effective to use. I hope you give Earth Day some thought and maybe try to find one thing you can do to help the environment. Although what we do seems so small, even the littlest effort can make a big difference.


Friday, April 20, 2012

Beans Beans the Magical Fruit

Beans are super nutritious. Just 1 cup, of these complex carbohydrates, contains about 16 grams of protein, not to mention they're a great source of fiber, calcium and folate (americanbean.org). WebMD reported a study that showed, "bean eaters weighed, on average, 7 pounds less and had slimmer waists than their bean-avoiding counterparts". Well, I'm sold! My favorites are probably black and lentil, but I like having a wide assortment on hand. Have you ever tried reconstituting dried beans? If you haven't tried, you should. Now that we do this, it's hard to think about having canned beans. The only trick to this is knowing you're going to want them so you can prepare them. To reconstitute beans, except lentils, add 3 parts water to 1 part beans (6 cups water to 2 cups beans). Let the beans soak 4-6 hours (or overnight), then drain and rinse. To cook, add just enough water to cover, bring to a boil, then cover and simmer on low for 1 hour, or until tender. Lentils are much easier to prepare as they don't need to soak. Just add them to boiling water (3 parts water to 1 part lentils) and boil 20-30 minutes (red lentils take less time than the more popular green, or French, lentils). A great tip is to make a large batch of beans, then freeze what you don't need for your dish. We usually do a rice and bean dinner once a week, make black bean burgers and add them to soups. Whatever you do, give beans a chance!  

Like a Big Pizza Pie


I love pizza! Making homemade pizza dough is fairly easy, can be made in large batches and frozen for future use, and is super rewarding. My favorite pizza dough recipe is by Alex Guarnaschelli, Food Network chef and executive chef at Butter restaurant in NYC. I make minor adjustments here and there, and it always tastes great. Sorry, this one's a bit lengthy.

·         2-1/4 tsps-Active Dry Yeast
·         1-1/2 Cups-Warm Water (about 110 degrees F-I microwave for 1 minute on high)
·         3-1/2 Cups-All-Purpose Flour (plus additional for rolling dough-I usually substitute 1/2 with whole wheat flour)
·         2 tsps-Salt
·         1/2 tsp-Ground Pepper (recipe calls for white, I always use black)
·         1 Scant Tbsp-Honey
·         1 Tbsp-Extra-Virgin Olive Oil (Plus additional for coating bowl and greasing trays)
·         Additionally I add Greek or Italian Seasoning into the dough for added flavor

In a large bowl combine the yeast and warm water. Stir to dissolve the yeast and allow the mixture to rest for 5 minutes. Using a sieve, "sift" about half of the flour over the yeast mixture and blend until smooth with your hands. Add the salt, pepper and honey and mix to blend. Sift in the remaining flour and mix to blend.
Lightly flour a cutting board or flat surface. Turn the pizza dough onto the floured area and knead for 3 to 5 minutes. The flour should feel smooth and the ingredients fully integrated. Place the dough inside a lightly oiled large bowl. Cover with plastic wrap or towel and let rest in a warm place, about 1 1/2 hours or until doubled in volume. 
Press gently on the dough and turn it onto a floured surface. Divide the dough into 2 or 4 equal parts, depending on size of pizza you would like. Roll each dough into a loose ball, cover with a clean kitchen towel and allow the dough to rest for an additional 15 minutes. Flatten each ball, and roll into a 12-inch round, if making 2, or 6-inch round, if making 4. Place each round on a lightly greased baking sheet. If your dough is not cooperating, you can just keep working it, or let it rest longer. I've found that the more rested my dough, the easier it is to roll/stretch. I try to incorporate some fancy pizza parlor skills, but there's no pizza dough tossing in my kitchen...
To Top:  I always brush with olive oil and use pasta sauce since I have that on hand and never go through a whole pizza sauce before it goes bad. I use about 3 large spoonfuls of sauce. If I use chopped fresh garlic I sprinkle that on next, then a layer of cheese. Top with whatever vegetables and/or meat you choose and sprinkle lightly with remaining cheese. As a side note, for pepperoni lovers, Hormel's turkey pepperoni is a great alternative and comes in a resealable package. Bake at 425 degrees F for 18-20 minutes. If the crust is not as crispy as you would like, place back in warm oven after slicing. Baking on a pizza stone also helps. Now the best part...ENJOY!! This will be our dinner tonight. I had pre-made the dough and frozen it. To thaw and use, I pulled it out of the freezer this morning, and it is already starting to thaw. When first making it I let it rose, so that's not hugely important, but I do have it in an oiled bowl to get to room temperature. If you're working all day, just pull it out the night before and put it in the fridge. Cold dough is pretty easy to roll out, just divide it and let it rest the 15 minutes and it should roll well. Those are my tips! : ) I haven't tried to grill the dough, but if I do and it works out, I'll let you know. That sounds like a fun idea for summer.
 

Thursday, April 19, 2012

Whole Foods Oatmeal Pie

This is an amazing recipe from Whole Foods, if you like oatmeal. The pie makes a great breakfast for either at home or on the go, as it's easy to slice a piece and throw in a container. Lily, our 15 month old, also really loves it, which makes it even better in my book! Did I mention it's super healthy??
  • 2 Cups-Frozen Mixed Berries (I always use a combination of blueberries and raspberries or strawberries) 
  • 2 Cups-Old Fashioned Rolled Oats 
  • 1/2 Cup-Chopped Nuts (The recipe calls for pecans, but I've always used almonds. These could be completely omitted if you wanted) 
  • 1 tsp-Baking Powder 
  • 1/2 tsp-Salt 
  • 1-Organic Apple (Grated-about 1 cup-The recipe says to peel the apple and I never do) 
  • 1 Cup-Milk (Your fat preference) 
  • 1/2 Cup-Nonfat Vanilla Yogurt (I've also just used plain yogurt, which tastes great, just a bit less sweet)
  • 1/3 Cup-Maple Syrup 
  • 2 tsps-Vanilla Extract 
  • 1-Egg Plus 1-Egg Yolk 
Preheat oven to 375. Grease a 9 inch pie pan with cooking spray or butter and set aside. In a large bowl mix together oats, baking powder, salt, grated apple, nuts and berries. In a separate bowl mix the yogurt, milk, eggs, vanilla and maple syrup. Combine the wet with the dry ingredients and place in the pie pan. Bake for about 50 minutes, until lightly golden on top; slice and eat. This can be eaten soon after it's cooked, or put in the refrigerator to have the next day. Fun additions to this would be grated carrot and/or zucchini. We sometimes put a little whip cream on top...it is a pie after all!
http://www.wholefoodsmarket.com/recipes/3073

Super Cheap / Super Easy Pierogie Dinner

Here's a great idea for a cheap dinner that's easy to prepare and super tasty.
  • 1-2 Boxes Mrs. T's Pierogies (Found in the freezer section-We usually get the potato and cheddar)
  • 1 Jar Salsa or Pasta Sauce
  • Shredded Cheese  to cover (Cheddar or Mozzarella)
So it's really that easy! Adjust the amount of pierogies you use based on your family size. Layer the pierogies and sauce in a baking dish, sprinkle with cheese, cover and bake at 350 till hot and bubbly, about 45 minutes. This recipe could be easily adjusted, with chopped up vegetables or frozen corn and beans added on top of the layers. Having frozen pierogies on hand, although I'm sure not as good as homemade, is an awesome go to for a main dish or side item for any dinner. The little ones really like it too!   

Wednesday, April 18, 2012

Smooth-tastic!

I love smoothies, especially after a morning run. Here's how I like to make them.
  • Greens-lots of them (I like baby spinach, kale, Swiss chard, cabbage, etc.)
  • 1-Carrot
  • 1-Stalk Celery
  • 1/2-Apple
  • 1-Banana
  • 1/2-3/4 Cup-Frozen Fruit (Blueberries, Strawberries, Cherries, Cranberries, Raspberries, Mango, etc. - I like to use a mixture)
  • 1 heaping tsp-Spirulina Powder
  • 1 heaping Tbsp-Hemp Seed
  • 1 heaping Tbsp-Ground Chia Seed
  • 1/2 Cup-Plain Yogurt (Fat Free)
  • 100% Juice and/or Milk (soy?)-Add enough to get to your preferred thickness
I use a Vita Mix so I throw everything in and blend, no chopping/juicing necessary. The above makes a good amount; enough for 2 large and 2 small glasses, which is exactly the size of my family. : ) I always let Elia take the first sip, and if she likes it, I know it's good. : ) We've gotten lucky, because this combination always creates an awesome Smoothie!!


Cooking is Easy

I take a lot of inspiration for cooking from various cooking programs I watch and recipes I read, however, I have a very hard time following recipes. In my experience, except for baking, recipes can be changed and tailored to whatever  you want them to be. Always try to incorporate fresh vegetables into everything you make. Who needs a thick greasy meatloaf made entirely of ground beef when it can be made with ground turkey breast and packed full of finely chopped peppers, onion, mushrooms, zucchini, spinach, etc.? Whatever you do, don't fear the unknown, for it could be amazing! As long as you understand the basics of any given recipe, take the creative challenge to make it your own and integrate new ideas week after week. 

Wednesday, April 11, 2012

Great for the Bum Baby Wipes

Lily has been very sensitive to baby wipes, even Huggies and Pampers Sensitive Wipes, so I've done some research and this is our method. We found a recipe for homemade wipes, and her bottom has been amazing since.
  • 1 Tbsp Witch Hazel (I use Thayers Rose Petal Witch Hazel with Aloe Vera)
  • 1 Tbsp Rose Water (I use whatever I find, and have used 1 tsp of a concentrated rose water)
  • 1/2-3/4 Cup Water
  • 25 Large or 50 Half Sheets Paper Towel (Cut in 1/4s or 1/2s depending)
Cut your towel and place in a Ziploc bag. Mix the liquid and pour over the wipes. Let it stand, and the towel will absorb all the moisture. You can always adjust the amount you make and just remove or add extra liquid.
Her bottom will still get red on occasion, so using the zinc oxide creams like, Bordeaux's Butt Paste, work nice, but also just a little squirt of Aloe Vera gel works for everyday use. We usually use the zinc oxide paste only when it gets really red, as sometimes the Aloe will sting. Another great tip is a warm baking soda soak, and warm olive oil wipes when the bottom is already red and sore. Since we've started using these, her Bum looks great.  

Awesome Smorgasbord Soup

Our 3-1/2 year old, Elia, is not the biggest vegetable fan, but in an attempt to get a dinner together that would be ready after our Kindermusik Family Class, out came the Vegetable/Bean Smorgasbord Soup.

Ingredients:
1-28oz can diced tomatoes
3-medium carrots peeled and diced
2-large celery stalks diced
1-small/medium onion diced
1-large clove garlic minced
1/2-zucchini diced
1/2-red pepper diced
1 cup frozen corn
2 cups dried beans (I used 1 cup of black and 1 cup of soup bean mix)
2/3 cup quinoa
8 cups broth (I used 4 cups vegetable and 4 cups chicken broth)
salt to taste
other spices you desire (I used some Mural of Flavor by Penzeys)

To Make:
Soak beans in 6 cups water 4-6 hours, then drain. Put enough water in pot to cover beans and bring to a boil. Once boiling turn down to simmer and cover, cook for 1 hour. Add all the other ingredients to a slow cooker. Once beans are done throw them in the slow cooker and mix. Cook till ready to eat.

Elia said she loved all the vegetables in the soup and ate 1-1/2 bowls full. This was amazing since she usually has issues eating certain cooked veggies. Either way, I love it and it's packed full of protein without having meat, something I prefer not to have that much of. Please try it and adjust the vegetables and seasonings to what you have at home.